You are hereHome / Arduino Projects / Project Page: Colors
Project Page: Colors
Colorful Imagination
Ken Nordine, who is often associated with the beats from the 1950’s, invented an art form called Word Jazz. The first time I heard a recording of him I was hooked. One of the albums he recorded is called Colors and I find it really imaginative. There are 24 tracks, each one dedicated to a particular color. A track might explain how a color came to be, the temperament of the color, how it interacts with the other colors, what it represents or, in the case of maroon, ask us how many words we can rhyme with it.
I wanted to create a project that would showcase Nordine’s work. Ideally the person interacting with it would choose a color and contemplate what the track would be about before playing it. Colors would be selected, I decided, by choosing one of several pieces of colored card stock. The home improvement store gives away card stock in every color needed. Not sure why they do that but it can be found in the paint section.
Sensing Color
You’re probably thinking that this would be a great time to use a color sensor, and so did I. There is something about simply reading the color of an object, with no tricks up my sleeve, to select a track that I found appealing.
It turned out to be impossible to get anywhere near 100% accuracy using a color sensor. One would expect having difficulty distinguishing between read, burgundy and crimson but there were also misreadings of colors that look nothing alike, at least to the human eye. After trying a progression of techniques in software, from comparing raw RGB values to comparing RGB values as percentages of the whole to computing a distance between known and read colors the sensor had to be abandoned.
It was time to switch to a tried and true technology, which for me means RFID. For the person interacting with the project there may be little difference between an embedded RFID tag and a color sensor but to me it’s just not as magical.
Look and Interface
 Deciding the look of the project was more difficult than selecting the technology. At one point I was thinking about invoking the look of a jukebox with flashing lights and a mechanism like a coin acceptor where the color chip would be inserted. That seemed like more fabrication than I was up for and ended up thinking more in terms of a radio.
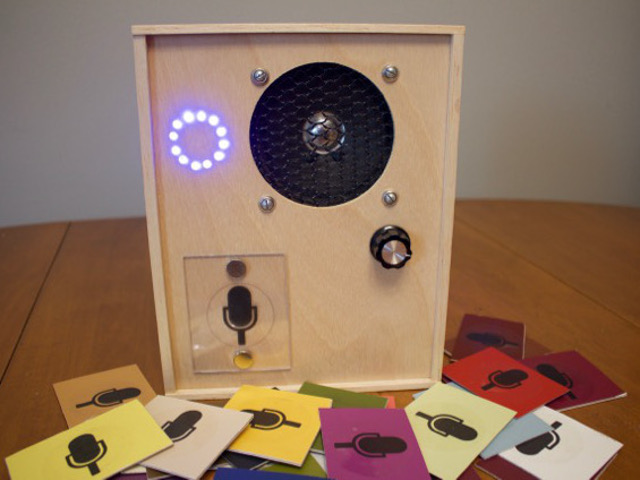
The concept of flashing lights was kept in the form of a circular ring of NeoPixels that rotate between animations when a track is playing. Each animation is, of course, in the color of the selected track. The idea of having the lights in a circle is that they are replacing the station dial of a real radio.
How to cue people to tap a color? I originally thought of using words, something like “Tap a Color” but decided on a more subtle approach. Color chips are constructed by gluing two pieces of card stock to a piece of cardboard sandwiched in between. The cardboard has a hole in the middle where the RFID is placed.
Each color chip has a sticker with an image of a microphone printed on it. Attached with strong magnets to the project box is a piece of Lexan positioned in front of the RFID reader, which a matching microphone image. My hope is that is enough of a clue that the color chip should be held up to the microphone image.
Playing Sound
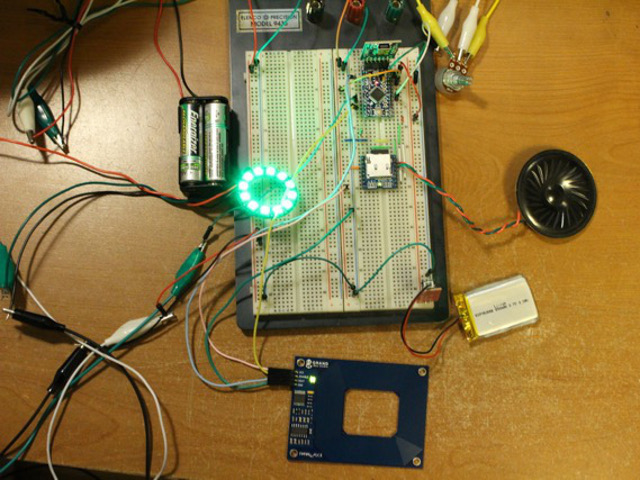
The first prototyping I did was with a full-sized Arduino Uno sporting an Adafruit Wave shield. The shield is a good piece of hardware but one reason I did not want to use it in the project is that volume is controlled by an onboard potentiometer and I would have to build the box around it.
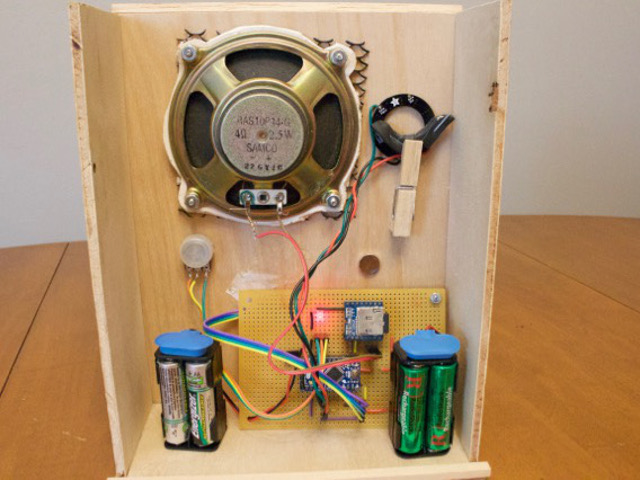 I had on hand a BY-8001-16P audio module that fit the bill for this project. It is a simple device that uses serial commands to play tracks and adjust the volume. Switching the microprocessor to a Pro Mini really downsized the electronics. The Pro Mini and audio player are attached to a proto board and the RFID reader is on the opposite side, secured with a nut and bolt. The neo pixels must have their own power supply or else they cause havoc with the audio playback.
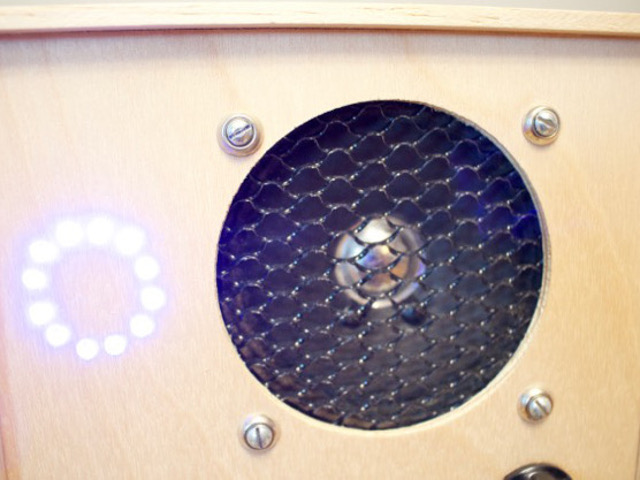 Some time ago I found a mangled radio by the side of the road after getting off a bus. It may have been smashed but the speaker was intact and now it plays Ken Nordine tracks on demand. While getting a pizza box ready for recycling one night I found a sheet of plastic with a cross pattern and immediately recognized it as the material for the speaker grille for this project.
To the left of the grille are holes for the NeoPixels to shine through. I photocopied the ring of LEDs to make a template and drilled the holes using my Dremel drill press. The circle is not perfect but pretty close. The NeoPixel ring is behind the plywood and comes to life when a track begins playing. I really like the affect this gives of light shining through the wood without seeing its source.
 While I originally thought the idea of colored lights might be too in-your-face and take away from Nordine's tracks, I've come to like it and even accept that it might be necessary for people in this age of impatience. The tracks play until their end, no skipping ahead or stopping early allowed, maybe having flashing lights to look at will help people hang in there.
Where's the Magic?
This project contains some digital magic that might impress some people. They tap a piece of cardstock to plywood and an audio track begins to play. The real magic for me is the unleashing of Nordine's imagination, getting me to think in ways that I otherwise would not. In the end the real trick is not triggering audio and lights, which Arduino makes easy, but getting people to listen to and appreciate recordings from the 1950's.